How to Insert Text Box in Google Sheets: A Step-by-Step Guide
Learn how to insert a text box in Google Sheets with a complete, step-by-step guide, tips for formatting, and troubleshooting to annotate data clearly in shared spreadsheets.

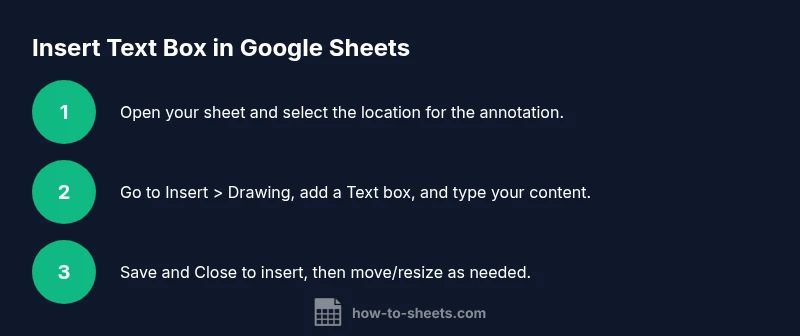
Insert a text box in Google Sheets by using Insert > Drawing > Text box, type your content, then Save and Close to insert the drawing into your sheet. You can move and resize it, align with cells, and format the text. This guide walks you through the exact steps and best practices.
What is a text box in Google Sheets and why use one?
A text box is a movable annotation you can add to your spreadsheet using the Drawing tool. It lets you place notes, labels, or instructions outside the grid, without clogging cells or altering formulas. This is especially useful for dashboards, reports, and student projects. Whether you're annotating sample data, explaining a calculation, or guiding a reviewer, a text box can highlight key insights. In this guide, we cover how to insert text box in google sheets step by step, plus formatting tips, troubleshooting, and best practices.
Quick steps to insert a text box
To start, open your Google Sheet and decide where the annotation should appear. Go to Insert > Drawing, then choose Text box in the Drawing dialog. Type your content, apply basic formatting (bold, color, size), and click Save and Close. The drawing will appear on your sheet as a movable object. You can drag it to align with cells and resize it for clarity. If you need to reposition later, simply select and drag again.
Understanding the Drawing tool and text box behavior
Text boxes in Google Sheets are created inside a Drawing canvas, which becomes a floating object on your sheet. They do not edit cell values directly, and they do not automatically resize with cells. Because they're separate objects, text boxes are ideal for comments, instructions, or legends that should not interfere with formulas or data inputs. When you share the sheet, keep in mind that collaborators may need permission to view the drawing; otherwise, the box may not appear in embedded views.
Formatting for readability and impact
Start with a high-contrast text color against your sheet background. Use a readable font size (12–14 pt on most displays) and avoid long paragraphs inside the box. Add a subtle border or fill to differentiate the box from the cells, and consider a transparent fill to reduce visual clutter. Align the text box with the grid lines or data labels to guide the reader’s eye. For accessibility, include succinct content and avoid color-only emphasis.
Dynamic content and content linking considerations
Text boxes cannot automatically pull values from cells in Google Sheets. If you need dynamic content, place values in adjacent cells and copy or paste the text into the text box, or recreate content in the drawing and update it manually. For dashboards, combine a text box with a chart or KPI labels to provide context. If your workflow requires frequent updates, plan a small template you can reuse.
Common pitfalls and how to avoid them
Avoid overlapping text boxes with important data, which can obscure grid lines. Don’t rely on a text box for critical data input or calculations. Remember that text boxes are drawings and may not print exactly the same across printers or export formats. Always test after sharing to ensure recipients can see and read the content clearly. Keep content concise to prevent clutter.
Practical use cases across roles
Students can add quick notes next to assignments or sample datasets. Professionals can annotate charts in a project dashboard without altering the underlying data. Small business owners can provide contextual guidance on a pricing sheet or inventory dashboard. In each case, a well-placed text box communicates intention and reduces misinterpretation.
Accessibility, sharing, and collaboration tips
When collaborating, place text boxes on a dedicated layer or side panel to minimize interference with data. Use Google Drive permissions to control who can edit the Drawing content. If recipients use mobile devices, verify that the text remains legible after resizing or moving on small screens. Consider exporting a PDF to confirm the layout remains intact.
Best practices checklist and next steps
Create a short, clear note for each text box. Keep the content up to date and mirror formatting across multiple boxes for consistency. Combine text boxes with legends, arrows, or number cues to guide readers through the sheet. Save a template sheet with your common annotations for future projects and share examples with teammates.
Tools & Materials
- Computer or device with internet access(Any modern browser; Chrome recommended for best compatibility.)
- Google account with Sheets access(Required to access Google Sheets and Drawing tool.)
- Mouse or trackpad(Precise dragging and placement of the text box.)
- A sample Google Sheet to annotate(Helpful to practice, but optional.)
- Color/style reference (optional)(Helps maintain consistent formatting.)
Steps
Estimated time: 15-25 minutes
- 1
Open the target Google Sheet
Launch Google Sheets in your browser and open the file where you want to insert the text box. Decide the exact spot based on readability and layout. This initial planning reduces later adjustments.
Tip: Survey nearby cells to choose a location that won’t obscure important data. - 2
Insert the Drawing tool
Click the menu, choose Insert, then select Drawing to open the Drawing canvas. This is where you’ll create the text box content.
Tip: If the option is missing, verify edit access to the sheet. - 3
Add a Text Box
In the Drawing dialog, click the Text box icon and click in the canvas to start typing. Enter the desired annotation.
Tip: Use Shift+Enter for line breaks to control wrapping. - 4
Format the text
Use the formatting options to adjust font, size, color, and alignment for readability in your sheet.
Tip: Aim for a consistent style across all text boxes in a workbook. - 5
Save and insert into sheet
Click Save and Close to insert the drawing into the sheet. The text box becomes a floating object on the canvas.
Tip: If it lands off-screen, drag it back into view. - 6
Move the text box to the desired position
Drag the inserted text box to its final location, aligning it with data labels or margins as needed.
Tip: Hold Shift to constrain movement when aligning precisely. - 7
Resize and refine
Use the corner handles to resize and reposition until the box fits the layout without obstructing data.
Tip: Check on different screen sizes to ensure legibility. - 8
Edit content later
Double-click the text box to reopen the Drawing editor, make changes, then Save and Close to apply.
Tip: Plan edits to minimize repeated adjustments. - 9
Reuse or manage
Duplicate an existing text box for consistency or delete as needed to maintain a clean layout.
Tip: Maintain a small template of common annotations for reuse.
FAQ
Can I edit the text inside the text box after inserting it?
Yes. Double-click the text box to reopen the Drawing editor, modify the text, and click Save and Close to apply changes.
Yes. Double-click the text box to edit, then save to apply.
Will the text box move with cells when sorting or filtering?
Text boxes are floating drawings; they don’t move with cells during sorts or filters. You must reposition them after changes.
No, they stay put as floating objects.
Can I link a text box to a cell value?
Direct linking isn’t supported. Copy content from cells to the text box or recreate dynamic content in the Drawing as needed.
Direct linking isn’t available; you’ll need to copy values manually.
How do I delete a text box?
Select the text box and press Delete or Backspace, or right-click and choose Delete. It will remove the box from the sheet.
Select and delete to remove it.
Are text boxes available on mobile Google Sheets?
Text boxes via the Drawing tool can be accessed on mobile, but editing may be limited compared to desktop.
Yes, but editing is more limited on mobile.
What are best practices for using text boxes?
Use concise notes, consistent styling, and place boxes where they support comprehension without cluttering the sheet.
Keep notes short and consistent for clarity.
Watch Video
The Essentials
- Insert a text box using Insert > Drawing > Text box.
- Text boxes are floating annotations, not cell values.
- Format boxes for readability and align with data labels.
- Edit by reopening the Drawing editor and saving changes.
- Reuse templates for consistent annotations across sheets.