Google Sheets Checklist for Mobile: A Practical Guide
Learn to build a mobile-friendly Google Sheets checklist with templates and checkboxes. This guide covers setup, offline access, sharing, and syncing across devices.

In this guide you will learn how to build a mobile-friendly Google Sheets checklist, optimize for touch input, and sync across devices. You’ll set up a reusable template, use checkboxes, data validation, and conditional formatting to track tasks on any phone or tablet. We cover layout considerations, formula tips, offline access, and how to share with teammates.
Getting Started with google sheets checklist mobile
A mobile-friendly google sheets checklist mobile is designed for touch input on phones and tablets. In this section, we outline the goals: fast data entry, reliable syncing, and easy sharing across devices. Using a lightweight template keeps you productive on the go. The reader should arrive here knowing that the objective is a practical, durable checklist that works offline and online alike.
Why mobile optimization matters for checklists
Mobile checklists democratize task tracking by putting your to-dos in a pocketable view. On small screens, clarity and speed matter: larger tap targets, simple typography, and minimal scrolling reduce friction. When you design for mobile, you also bias features that work offline, sync reliably, and allow quick updates during travel or fieldwork. The goal is a trustworthy interface that you can rely on anywhere, anytime.
Core elements of a mobile template
A solid mobile checklist template includes: (1) Task column for descriptions; (2) a Status or Priority column to sort items; (3) a Done column with checkboxes for quick completion; (4) a Due Date column, if deadlines are needed; (5) lightweight data validation to keep statuses consistent. Keep the layout compact, with bold headers and clear alignment to avoid mis-taps. This section also demonstrates how to name the sheet and use a minimal color code that remains legible on mobile screens.
Step-by-step design choices for mobile layouts
Choose a single-tile header row, prioritize essential columns, and limit horizontal scrolling. Use larger font sizes and 8–12pt tap-friendly row heights. Consider using frozen header rows to keep column labels visible as you scroll. For visual cues, apply simple conditional formatting like green for done and yellow for in-progress. These choices improve usability without overwhelming the screen.
Practical workflow: from setup to sharing
Start by opening Google Sheets on your mobile and creating a new sheet from scratch or a starter template. Add the key columns (Task, Due Date, Status, Done). Insert checkboxes in the Done column, then set data validation for the Status column to keep entries consistent. Finally, share the sheet with teammates and test syncing across devices to confirm that changes propagate in real time.
Common pitfalls and how to avoid them
Avoid overcrowding the sheet with too many columns; mobile screens struggle with horizontal scroll. Don’t skip offline setup—ensure you enable offline access for continued work when the internet is unavailable. Be careful with complex formulas in mobile; prefer simple validations and clear text. Regularly review permissions when sharing to protect data integrity.
Authority sources
- https://www.ed.gov/
- https://www.nih.gov/
- https://www.britannica.com/topic/checklist
These sources provide context on the importance of structured processes, data management, and general productivity practices that underpin checklist design across platforms.
Tools & Materials
- Smartphone or tablet with internet access(Install Google Sheets app or use a mobile browser)
- Google account(Needed to sign in and save to Drive)
- Mobile data plan or stable Wi-Fi(Essential for syncing across devices)
- Starter checklist template(Optional pre-made template you can customize)
- Optional: stylus or confident finger taps(Helpful for precise tapping on small screens)
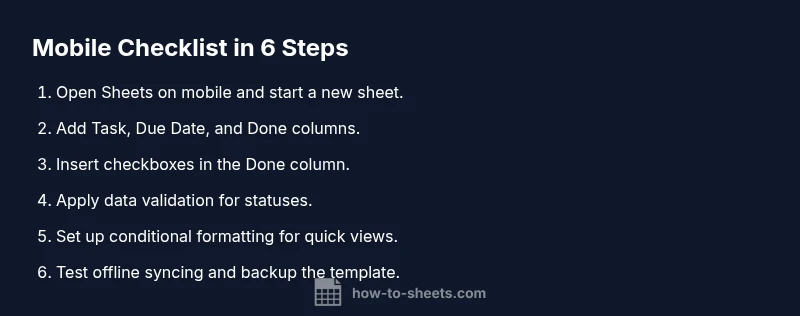
Steps
Estimated time: 20-40 minutes
- 1
Open Google Sheets on your mobile device
Launch the app or mobile site and sign in with your Google account. Create a new blank sheet or open an existing mobile-friendly template. Verify you have internet connectivity for initial setup.
Tip: If Sheets isn’t loading, switch to a stable connection or try a different browser. - 2
Create a new checklist template
Add essential columns: Task, Due Date, Priority, Done. Name the sheet clearly (e.g., “Daily Tasks”). Keep column order consistent to simplify scanning on small screens.
Tip: Use a short, action-oriented header for quick recognition. - 3
Add a Done checkbox column
Select the cells in the Done column and insert checkboxes. This enables quick, tap-friendly completion tracking without typing. Align checkboxes vertically for readability.
Tip: Ensure the checkbox column remains narrow to fit on smaller devices. - 4
Apply simple data validation
For Status, restrict values to a small set (To Do, In Progress, Done). This reduces entry errors and keeps filters reliable on mobile.
Tip: Create a named range for statuses to reuse across sheets. - 5
Set up basic conditional formatting
Highlight rows based on Status or Due Date to draw attention. Use minimal colors that remain legible on mobile screens.
Tip: Test colors on your device to ensure contrast is adequate. - 6
Test offline and syncing
Enable offline editing in Google Drive settings, then perform updates offline and verify changes sync when online. This step ensures reliability on the go.
Tip: Keep a backup copy of the template just in case. - 7
Share and collaborate
Tap Share, set permissions, and specify collaborators. Confirm that changes propagate across devices in real time.
Tip: Limit access to trusted teammates to protect data.
FAQ
Can I use checkboxes in Google Sheets on mobile?
Yes. You can insert checkboxes on mobile via the insert menu. They work well for quick task completion without typing.
Yes. You can insert checkboxes on mobile using the insert menu.
Is offline access available for mobile checklists?
Google Sheets supports offline editing if you enable offline in Google Drive. This lets you work even without an internet connection.
You can edit offline if you enable offline in Drive.
Can I share a mobile checklist with teammates?
Yes. Use the Share button and set permissions so teammates can view or edit as needed.
Share with teammates by tapping share and setting permissions.
How do I reset a template for new tasks?
Copy the sheet or use a prepared template to start fresh. Clear old data and reapply the checklist structure.
Copy the sheet to reset and start fresh.
What are best practices for data validation on mobile?
Use dropdowns for statuses and simple lists to keep entries consistent. Validation reduces errors on touch devices.
Apply dropdowns and simple lists to maintain consistency.
Watch Video
The Essentials
- Plan layout before building the sheet.
- Use checkboxes to track completion.
- Enable offline access for reliability.
- Test syncing across devices regularly.
- Share with teammates using proper permissions.