Google Sheets View Only: A Complete Step-by-Step Guide
Learn how to set Google Sheets to view-only, share with restricted access, and protect data while enabling collaboration. Practical steps, tips, and caveats for safe, effective sharing.

You will learn how to turn a Google Sheet into view-only mode, share it with restricted access, and protect sensitive data while enabling collaboration. This guide covers different sharing methods, how to revoke or adjust permissions, and best practices to maintain data integrity. Prerequisites: a Google account and access to the sheet.
What 'view-only' means in Google Sheets
In Google Sheets, 'view-only' is a sharing state where recipients can see data but cannot edit it. Roles in Google Sheets include Viewer, Commenter, and Editor, and you select these per person or group. For most situations you’ll assign Viewer access to prevent changes, while optionally allowing comments. In Workspace environments you can also disable downloading, printing, and copying for viewers and commenters. If you need feedback without edits, use Commenter instead of Editor. Always verify the effective permissions by testing with a secondary account.
Why use view-only in education and business
View-only access is essential when you want to share dashboards, schedules, or reports without risking accidental edits. Teachers can distribute assignment sheets while keeping the master data intact; managers can share project trackers with stakeholders who only need to view progress. For external collaborators, view-only links reduce exposure and simplify compliance. When collaboration is required, you can adjust permissions later or publish a static version of the data to a web view.
How permissions propagate: owner, editors, and viewers
The owner controls who can access and what they can do. Editors can modify data, restructure sheets, and share with others unless you restrict them. Viewers can only observe; they cannot change or annotate. Be aware that some settings affect all viewers, such as 'general access' options, and that changing access levels may require re-sharing and notifying affected people. Regularly audit who has access to ensure alignment with current needs.
Practical steps: preparing your sheet for view-only sharing
Before sharing, decide who needs access and what they will do with the data. Consider whether you should hide or protect sensitive ranges, or create a read-only view by duplicating the data into a separate sheet. Document the sharing policy so teammates understand their permissions and responsibilities. This preparation reduces back-and-forth and helps maintain data integrity.
Step-by-step: ensure each recipient has the right access
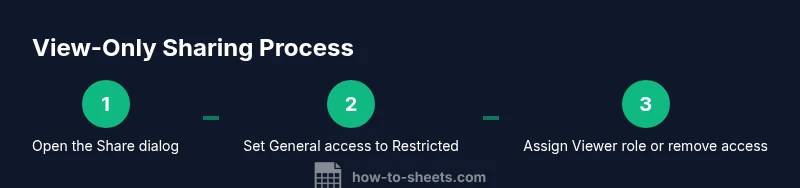
- Open the sheet and click the Share button.
- In the Share dialog, set General access to Restricted or choose Anyone with the link and restrict the role to Viewer.
- Under 'People' add each recipient with the Viewer role, or remove anyone who should not have access.
- If needed, turn off 'Editors can change access and share' to lock down further.
- Save and test access with a second account to confirm permissions.
Step-by-step: configure a view-only link safely
- If you must use a link, select 'Anyone with the link' and set the role to Viewer.
- Use the checkbox to disable downloading, printing, and copying for viewers and commenters where supported.
- Share the link only with intended recipients and monitor access period.
- Periodically revoke or adjust access as project needs change.
Protecting data beyond view-only: protecting sheets and ranges
View-only prevents edits, but you can add extra protection by locking specific sheets or ranges. Use Protected sheets and ranges to prevent changes by any user except those you explicitly authorize. This is especially important when you must share a broader document but still keep critical columns or formulas intact. Document which sections are protected for transparency.
Best practices for collaboration with view-only sharing
- Test access with a separate account to confirm what each recipient can see and do.
- Keep a current list of who has access and remove unused accounts promptly.
- Prefer explicit Viewer roles over broad general access when possible.
- Combine view-only with protected ranges for tougher data governance.
Common pitfalls and limitations
Be aware that viewers may still be able to copy or screenshot data if downloads are allowed; for sensitive data, use additional protections and consider exporting to a static file. Some features like comments require at least Commenter access; If you need real-time feedback, consider a controlled workflow with a mixture of viewers and commenters.
Troubleshooting common issues
If someone reports they cannot view the sheet, recheck the share settings, ensure they were added with the correct role, and confirm they are signed in with the right account. If a user cannot access through a link, reconfigure General access and re-send the invite. Finally, verify that the sheet isn't restricted at the domain level by an administrator.
Authority sources
- Google Drive Help: https://support.google.com/drive/answer/2450490
- Google Docs Editors Help: https://support.google.com/docs
- Wikipedia: Google Sheets: https://en.wikipedia.org/wiki/Google_Sheets
Tools & Materials
- Google account with sheet access(You may need owner or editing privileges to adjust sharing settings.)
- Target Google Sheet(Ensure you have access to modify sharing or own the sheet.)
- Stable internet connection(Recommended for smooth sharing configuration.)
- Recipient email addresses (optional)(Needed if granting explicit Viewer access to individuals.)
- Documentation reference (optional)(For later auditing of permissions.)
Steps
Estimated time: Estimated total time: 10-15 minutes
- 1
Open the sheet and access the Share dialog
Click the Share button in the upper-right corner of your Google Sheet to open the sharing settings. This is the first actionable step to control who can see or edit the document.
Tip: Test the permission state by opening the sheet in an incognito window after you click Share. - 2
Set General access to Restricted
In the Share dialog, set General access to Restricted so only invited people can view the sheet. This prevents accidental exposure through broad link sharing.
Tip: Restrict access before adding people to ensure you don’t accidentally expose data. - 3
Add recipients with Viewer role
Enter each collaborator’s email and assign the Viewer role. Avoid giving Editor rights unless absolutely necessary.
Tip: If you later need feedback, consider adding Commenters instead of Editors. - 4
Disable Editors’ broad permissions
Uncheck or disable the option that allows Editors to change access and share with others to prevent cascading permission changes.
Tip: This reduces the risk of permission drift over time. - 5
Configure link sharing (if used)
If you must share via a link, set the link to Viewer and consider enabling restrictions on download/print/copy when available.
Tip: Link-based access should be temporary and monitored. - 6
Verify access with a second account
Log in as a different user to confirm they can view but not edit the sheet. Adjust as needed if something is off.
Tip: Verification helps catch mistakes before sending invites. - 7
Save, notify, and monitor
Click Send (if inviting specific people) or Save to apply changes, then periodically review who has access and revoke as needed.
Tip: Create a reminder to audit permissions regularly.
FAQ
What does 'view-only' mean in Google Sheets?
View-only means recipients can view data but cannot edit, comment, or share the sheet unless you grant a higher permission. Depending on settings, downloads may also be restricted.
View-only means you can see the data but can’t change it. If you need input, use comments or request access changes.
Can I allow comments but not edits?
Yes. Instead of Viewer, you can share as Commenter to allow feedback without direct data modification.
Yes, you can let people comment but not edit the sheet by choosing the Commenter role.
How do I revoke access later?
Open the Share dialog and remove individuals or change General access to restrict who can view. Notify users if appropriate.
You can revoke or adjust permissions anytime from the Share dialog.
Will viewers be able to copy data?
If the sheet allows downloads, viewers may copy or export data. You can disable download/print/copy where supported to reduce this risk.
They might copy data if downloading is allowed, so consider additional protections.
Is there a difference between view-only and read-only?
In Google Sheets, view-only and read-only generally refer to the same concept: non-editing access. Specific terminology depends on context and product updates.
They’re basically the same idea: people can see but not edit.
Watch Video
The Essentials
- Assign Viewer as default for broad sharing
- Prefer restricted access with explicit invitations
- Test access with a second account before sending invites
- Protect sensitive ranges for stronger data governance